PALWORLD 1.0 REVOLUTION: THEORYCRAFTERS UNVEIL BROKEN “SOLO MECHANICAL BOW” BUILD THAT FACE-TANKS ENDGAME BOSSES WITHOUT PALS
THIS MECHANICAL BOW SOLO BUILD IN PALWORLD 1.0 IS SO BROKEN IT SHOULDN’T EVEN BE LEGAL! 🏹🔥
Who says you need a party of high-level fighting Pals or heavy rocket launchers to demolish the final endgame bosses in Palworld 1.0? Theorycrafters just unleashed a pure solo “Zero-Pal Combat” Mechanical Bow setup that lets you face-tank the hardest boss attacks in the game while pumping out 120,000+ damage per explosive headshot sequence! By combining Sylphia’s game-breaking 80% shield damage reduction with Lumen’s 30% explosive arrow secondary ticks and a 5-species weak point stack, you can literally stand still, ignore boss beams, and solo final bosses in minutes using just a green-rarity bow! But why are pro players warning that standing in continuous tick-beams will still break your loop if you ignore one critical shield threshold?
If you want the exact passive team stack, arrow mechanics, and face-tanking blueprints before Pocketpair rebalances this, check out the complete guide right now! 👇

Since the launch of Palworld version 1.0, endgame boss encounters have typically demanded high-level active combat Pals, complex elemental swap rotations, or heavy automatic firearm spam. However, a newly exposed playstyle has turned the entire combat meta on its head by proving that players can completely bypass active Pal combat altogether—relying instead on a pure solo setup powered by the Mechanical Bow.
Demonstrated by gaming mechanics researcher Solo Brit, this unconventional build allows solo survivors to face-tank the final endgame bosses on Palpagos Islands while delivering massive, multi-tiered headshot damage sequences reaching 120,000+ damage per burst. By stacking passive shield mitigation, explosive arrow damage ticks, and weak-point attack multipliers across a bench support team, players can comfortably clear final boss encounters in roughly four minutes using nothing more than an uncommon (un-maxed) Mechanical Bow.
The Core Philosophy: Zero-Pal Combat & Ultimate Defensive Shielding
Unlike conventional builds where the player relies on an active Pal to draw aggression or apply elemental status debuffs, the Mechanical Bow build operates entirely on passive bench support. The player functions as the sole damage dealer, while the active Pal slot remains empty or un-deployed.
To make a solo player invulnerable enough to stand still and line up precision bow shots against high-damage endgame bosses, the build leverages the synergy between the Ancient Shield and Sylphia.
Defensive Shield Mechanics:
Ancient Shield: Acts as the primary damage sponge, absorbing incoming hits before health values are affected.
Sylphia (Rank 5 Partner Skill): When fully condensed to Level 5, Sylphia provides two game-breaking passive defensive buffs while residing in the player’s active party:
Reduces shield regeneration delay by 60%.
Reduces incoming damage taken by the shield by a staggering 80%.
[Incoming Boss Attack] -> [80% Damage Absorbed by Sylphia Buff] -> [Ancient Shield Integrity Retained] -> [60% Faster Regen Kick-In] -> [Invulnerable Face-Tank Loop]
This interaction turns the player into an immovable tank. Boss laser beams and AOE strikes deal negligible damage to the shield barrier, and because the regeneration delay is reduced by 60%, the shield begins recharging almost instantly the moment an attack sequence ends—ensuring the player’s actual health pool is almost never touched.
The Offensive Engine: Explosive Arrows & Weak-Point Multipliers
While Sylphia handles survivability, the remaining four bench slots are strictly optimized to transform the Mechanical Bow into one of the highest single-shot damage weapons in Palworld 1.0.
Bench Support Party & Passive Synergies:
Lumen (Explosive Arrow Conversion):
Partner Skill: While in the party, player arrow attacks detonate on contact, dealing additional explosive damage equal to 30% of the player’s total attack damage.
Impact: Adds a secondary, guaranteed AOE damage tick to every single arrow fired, turning standard Mechanical Arrows into high-yield explosive rounds.
Seline (Species Multiplier):
Partner Skill: Increases the player’s attack power by +80% as long as all five Pals in the active party belong to different species.
Vannwyrm (Weak Point Multiplier):
Partner Skill: Increases damage dealt to enemy weak points (e.g., headshots or central core hitboxes) by +50%.
Cryolinx Terran (Alternating Weak Point Amplification):
Partner Skill: Increases the power of the next weak-point attack by +60% when striking target weak points. While non-stacking, this effect triggers on alternating headshots, creating massive damage spikes every second shot.
Gear Selection & Mechanical Bow Execution
One of the most surprising aspects of the breakdown is that the demonstration was performed using non-optimized, early-tier gear, highlighting the sheer raw potential of the build once fully min-maxed.
Player Equipment Loadout:
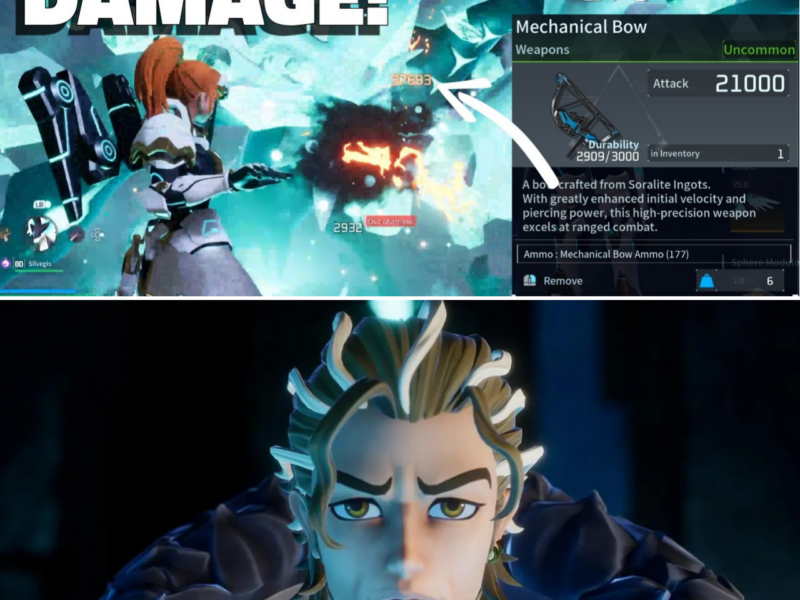
Weapon: Mechanical Bow (Green / Uncommon Rarity) paired with Mechanical Arrows.
Shield: Ancient Shield (Essential for the high base shield capacity).
Accessories: Duke Emblem (Player Attack Boost) combined with defense/utility accessories.
Deployables (Optional): Drone Launchers or Tear Prismas can be equipped to add passive automated DPS, though testing proved they are completely unnecessary for clearing final bosses.
Combat Strategy & Shot Rotation:
During combat, the player focuses exclusively on landing precision headshots on the boss model:
Body Shots: Deal baseline damage between 10,000 and 15,000 HP per arrow.
Precision Headshots: Trigger Vannwyrm, Cryolinx Terran, and Seline multipliers simultaneously, causing headshot damage to skyrocket to 35,000–40,000 base impact, followed immediately by a 30% explosive secondary tick from Lumen.
Chained Headshot Sequences: When landing consecutive headshots, rapid-fire sequences hit total damage ticks of 60,000, 90,000, and up to 120,000+ HP, melting final boss health bars in seconds.
Tactical Performance: Face-Tanking Testing & Critical Thresholds
During live combat testing against the final endgame boss, the solo Mechanical Bow setup achieved a clear time of approximately 4 minutes without deploying a single Pal into the arena.
Key Tactical Takeaways:
Near-Total Boss Beam Immunity: Standard boss projectiles, melee strikes, and floor traps bounce harmlessly off the Sylphia-buffed Ancient Shield, allowing the player to draw, aim, and release fully charged bow shots without flinching or interrupting their attack cadence.
The “Continuous Tick” Danger Zone: The only scenario capable of breaking the face-tank loop is standing continuously inside multi-hit sustained laser beams or persistent damage puddles. If the shield is completely depleted, the 80% damage reduction ceases to protect the player’s raw health bar. Players are advised to step out of long-duration beam channels briefly to allow the 60% faster regeneration delay to refill the shield instantly.
Rapid Charge Time: Unlike heavy rocket launchers or slow-charging beam cannons, the Mechanical Bow features an extremely short charge windup (under 0.5 seconds), allowing for continuous, high-frequency arrow releases.
Build Summary: Mechanical Bow Solo Setup
Component / Slot
Selected Item / Pal
Mechanical Role / Stat Multiplier
Primary Weapon
Mechanical Bow (Mechanical Arrows)
Rapid-fire, single-shot precision weapon with <0.5s charge time.
Defensive Anchor
Sylphia (Rank 5 Condensed)
-80% Shield Damage Taken, -60% Shield Regen Delay.
Explosive Multiplier
Lumen
Converts arrows to explosives dealing +30% Player Attack damage.
Species Offense
Seline
+80% Flat Player Attack (Requires 5 different species).
Weak Point Buffer 1
Vannwyrm
+50% Weak Point (Headshot) Damage.
Weak Point Buffer 2
Cryolinx Terran
+60% Power to alternating consecutive weak point strikes.
The Future Meta of Player-Centric Builds
The revelation of the Mechanical Bow solo setup highlights a significant shift in Palworld 1.0 min-maxing. By shifting reliance away from active Pal AI—which can often get stuck, misaim skills, or die during intense Hard Mode mechanics—players can take total control of boss encounters using passive party synergy and precision ranged fire.
For survivors looking for an economical, high-damage, and virtually invincible way to solo Palpagos Islands’ toughest content, mastering the Sylphia-Lumen Mechanical Bow rotation represents one of the most broken and satisfying playstyles available in version 1.0.